
Music reviews
&
helpful information about recording and mixing techniques. Posts written by professional engineers and musicians.
Learn about the inside secrets that engineers at Shine On Studio use in their sessions. Become a mixmaster and impress the world with your knowledge of audio production.
Gain Staging
Advice on how to make good use of the meters in your DAW and learn how to properly read them.
Getting the right levels in your mix is the very first part of the recording process. Paying attention to your input levels can pay dividends when it comes to the mixing process. Proper levels will yield a much more streamlined workflow when it comes to sitting down to mix.
So you maybe asking yourself, “What are the proper levels that I should be trying to achieve?“
The answer to this question can vary. You have to have a vision for the end result. If you don’t have that vision, then you should focus on getting levels that optimize your A/D converters. Most interfaces are calibrated for a sweet spot around -20dBFS to -16dBFS. Hitting this area as your target RMS level will almost always give you ideal tracks to mix.
Now if you’re sitting there scratching your head and not quite sure what all that means, don’t worry. Here’s a good rule of thumb to follow. Most meters in DAWs have a color coded display. Typically green is at the bottom followed by yellow, orange, and red. If you get your average level to hover right around where the green and yellow meet, then you’re in the ballpark. This means the middle point between your peak levels and your noise floor is close to that point where the meter changes colors.
Now of course it depends on what you’re recording. Different types of sound sources are going to give you different levels. Drums are going to have very sharp attacks that will yield higher peaks. Where as a vocal that isn’t too dynamic may just hover in the same area with little movement. One of the biggest problems that I see other engineers make is the level of their monitoring. Having your monitors up too loud or down to quiet will not truly give you a representation of the signal level. This is why you have to trust the meters and your DAW and let them show you what is actually happening with you levels. These are just pretty lights for you to look at while you’re working on your tracks. These are useful tools that can mean the difference between a good or bad mix.
It’s always a good idea to leave yourself some headroom when you’re tracking. You will want to have some space to mix and that is virtually impossible when your input levels hit -3dBFS or higher. Just be reasonable when you set your levels and keep in mind that you will be blending multiple tracks to mix down to your final print track.
NAMM 2019
Some thought and highlights from the 2019 NAMM convention in Anaheim, CA.
It was another great year attending the NAMM convention in Anaheim. This year I focused on making some new connections and getting to know more about the industry. I met many talented musicians and innovative thinkers. Yet, the information available was what really refueled my passion for recording and mixing.

Tony Maserati - NAMM 2019
I heard some great lectures by Tony Maserati, Fab DuPont, and Jacquire King, just to name a few. Taking mixes and letting them take on a life of their own seemed to be the universal theme from many of these talented engineers. Using parallel aux tracks to blend layers of textures was a reassuring message since that is how I do many of my layering techniques. What I found the most interesting was how each of these pros set up their EQ and compression chains. Seeing and hearing how they shaped sound has really opened my thinking about how to approach a mix.
I’m going to be spending a lot of my free time to practice some of these techniques and start developing some new signal chains. This will create a new sound for all of my mixes that will benefit every client at the studio.
Among the many things to see, experience, and hear at the NAMM convention, I also spent some time listening to the educational talks that where happening at NAMM U. I’d love to share some of the ideas and techniques that were discussed at these lectures. Set ups some time to come by the studio and we can engage in a discussion that will definitely help you get a better understanding of the music industry and how it can be integrated into your marketing and social networks.
High and Low Pass Filters on Vocals
EQ settings for vocals sometimes feels like you’re trying to find buried treasure. An endless task of moving knobs and listening to the changes just seems overwhelming. Then comes the conversation about filters on vocals that almost always arises in every session.
EQ settings for vocals sometimes feels like you’re trying to find buried treasure. An endless task of moving knobs and listening to the changes just seems overwhelming. Then comes the conversation about filters on vocals that almost always arises in every session.
There are a few things you can do to improve your vocal recordings and get them to sit in a mix. The first is using filters on your EQ to tighten up the high and low end spectrum. Filters on most EQ plugins have 3 main settings.
On/Off
Frequency
Curve/Slope
The first is obvious, so moving on to the second. Frequency is the point where the filter starts to engage. This is the point in the EQ spectrum where the audio is starting to be lowered or attenuated. On a High-Pass Filter (HPF) you are allowing the high frequencies to pass as you filter out the low frequencies. On a Low-Pass Filter (LPF) you are allowing the low frequencies to pass as you filter out the high frequencies. When these are used properly, you can clean up a recording to focus on the audio spectrum that you do want in the mix.

Brainworx bx_hybrid V2
For example, when you set your HPF to 50Hz it is only starting to attenuate the frequencies at that point. How much attenuation is based on the third parameter, the curve or slope. This is measured in dB octaves that are listed as 6dB, 12dB, 18dB, 24dB, and 30dB. These are referred to as ordered harmonics and a 6dB curve is a 1st order harmonic. This means that the signal level drops 6dB per octave. A second order harmonic is a 12dB slope and the signal drops 12dB per octave. The higher the slope the more severe the drop in audio signal becomes and approaches a “brick-wall” response, which is not usually favorable to your audio signal.
For vocals I like to use a 12dB slope for both the HPF and the LPF. Sometimes I’ll use a different setting if the mix needs some tweaking. For the HPF I typically start around 80Hz and then adjust the frequency based on the tone of the vocalist and the style of the music. It does take some time to train your ears to recognize the sound that you want for a mix. I don’t recommend making these changes with the track in solo mode. It’s better to have your track in the mix and listen to how the EQ adjustments affect your track and mix. Using a HPF correctly can help cut down on the rumble in a vocal track and tame some of the plosives that may happen if your vocalist is too close to the mic.
The LPF on vocals can be a bit more difficult to dial in. In many cases, the vocal spectrum in the high frequencies is OK to leave in the mix. If you’re trying to cut down on sibilance, it’s best to use a de-esser. However, if you want to shape the vocal to reduce the amount of high frequencies it has in the mix then you can use a LPF to get the job done. I’ll usually start around 10kHz with a 12dB slope and then sweep the filter frequency up and down to find a spot that works for the mix. Rolling off these high frequencies can make more room in a mix for other instruments or backing vocal tracks. Depending on the arrangement of the music you can get a tighter sound by filtering out these higher vocal frequencies.
For more info and visual tutorials, check out my audio mixing master class.

Mixing | Keyboards & Synthesizers
Keys and Synths are line level instruments that typically come directly into your console without amps being mic'd up. Let's discuss a little bit about running DI lines into your preamps or interfaces.
Keys and synths can appear to be an easy task to mix. They have dedicated outputs and don't require microphones. This very fact is what makes them difficult to tame sometimes. Their EQ spectrum can be all over the stereo field and this can make them unruly when it comes time to mix. My approach is to save the keys & synths for last. I like to mute them and address the drums, bass, guitars, & vocals first to get a nice even balance. Then the keys are like the icing on the cake. They layer a nice thick sound over the mix and it allows you to use surgical EQ to get the pockets filled to your taste. Keys are sometimes the glue that pulls a mix together and sometimes they cloud up the mix and make it murky.
Approaching keys with care can give you more control over the final balance of the mix. In some mixes, it would be a good idea to add some light delay on a 16th note. This can give the appearance of a wider sound for the keys in the mix.
Piano tracks typically benefit from proper EQ and a silky sounding reverb. The mood of the track will lead you to what style and depth of reverb to use. I love to hear a dark reverb with long tails, so I like to use a low pass filter on the reverb return. This allows the initial attack of the bright notes to shine with a very pleasing trail of dark tones following behind them.

Mixing with Headphones - Which Ones to Use?
Mixing with headphones can be productive if you follow a few helpful steps along the way. Let's discuss the advantages and disadvantages of mixing with headphones.
This is a question that seems to come up quite often, so here are my thoughts and some recommendations for mixing with headphones. First thing is that it is OK to mix with headphones. Lots of great albums have been mixed on headphones and you can get a professional sound. For many DIY musicians and home studio engineers, the mixing room is not always optimal for sound. A decent pair of headphones will give you a more accurate presentation of your mix.
Now here is a main factor to consider, the quality of your headphones really does matter. Not all headphones are created equal. Some headphones are designed specifically for the studio and others are designed for listening and playback. So how do you know what is the difference between headphones? Most studio headphones actually put on the packaging that they are studio headphones. But words don't necessarily mean that you will get the quality needed to mix properly. It is always advisable to listen to a pair of headphones before you commit to buying them. I don't recommend buying headphones because of the name brand or because someone famous endorses them. Companies are in the business of selling their product, so you can't just take their word or reputation for granted.
I've owned lots of different headphones over the years and some are good for recording, some good for mixing, and some good for listening and enjoyment. Every pair of headphones I've owned have had their own strengths and weaknesses. It just takes time for you to get used to the sound your headphones provide so that you can be productive in your mixing choices. If mixing with headphones is the route that you plan to take for your post-production, I'd suggest getting a decent pair of headphones. Many of the headphones in the $99 - $199 price range will give you a decent representation of your mix. Let me give you my experience with a few different models that are out on the market.

Sennheiser HD 280 Headphones
When I was starting out, I used Sennheiser HD280headphones for recording and mixing. These are great headphones for all applications and music. They have rich detail in the low-mids and don't get too harsh in the upper frequency range. That's a bit of good news for your eardrums. These headphones are comfortable and do collapse down for easy transport from one place to another. I'd say the big plus for these headphones is the price. At under $100, these are some of the most affordable professional headphones you can buy. Especially if you're on a budget and would rather spend your money on gear or mics. The ear pads can be replaced when they get old and worn out, so you can keep the feel of these headphones in a feels-brand-new fashion at any point.
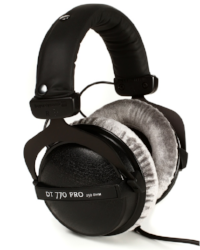
Beyerdynamic DT 770 Pro
I moved on to a pair of Beyerdynamic DT 770 Pro studio headphones. I was initially impressed with the comfort, quality, and sound of these headphones. I demoed a pair at a local pro audio shop and a few minutes later walked out with a brand new pair for the studio. Now these are a bit more price-wise, but you get quite a bit for your money. The large ear pads are extremely comfortable and they don't squish your ears against your head. This was a huge plus right off the bat for me. For $199, I felt like I purchased a quality pair of headphones that would give me many great hours of recording and mixing. I used these headphones for about 2 years and mixed some of my favorite albums with them. Yet as the years went by, I started to be a little more critical of my mixing and felt that these headphones were not giving me enough detail on the high-end. This was frustrating, so I went back to search for a new pair of headphones. However, I do still use these headphones for recording and mixing from time to time. I still like the comfort and the relaxed feel they provide. Most of my clients prefer this pair of headphones when they're tracking and I agree that these are headphones that you can wear for a long period of time and not get too fatigued.
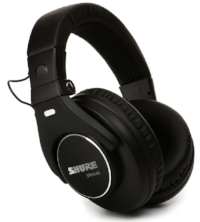
After some research and field testing of some different headphones, I decided to go with the Shure SRH840 professional studio headphones. There are a few reasons I chose this pair of headphones and I still feel like these are the right pair for most studio applications. The ability to easily replace the ear cushions and the cable are big advantages, so I'm already a little happier. This is just the tip of the iceberg. The sound quality of these headphones is transparent and dynamic. The drums that I've mixed with these headphones are crisp and punchy without being too muddy or boomy. I've also been able to get a better vocal balance in my mixes with these headphones. Having a good vocal balance can really make or break a song. You have to have faith in your headphones to give you a clear representation of your mix. To be able to trust your ears and rely on your headphones is crucial. These headphones are comfortable for short periods of time, but a long studio session can be rude to your ears and neck. These headphones are a little heavier than some other pairs I own and I notice that my neck can get cranky if I rock the headphones for too long. Overall, these are the best pair of headphones that I could find under $200.
Now one thing to keep in mind is that I don't solely use headphones to work on my mixes. I also use the studio monitors, but I regularly check my mixes with headphones. I recommend taking regular breaks if you are using headphones. Give your ears some time to recover and unwind from the constant noise that is only inches from the eardrum. These are just a few of the headphones that I own and/or have used in my career as a musician and producer. There are so many options out there and manufacturers keep improving on the designs, but I stand by my original statement that you need to go out and actually put the headphones on and listen to them for yourself.
Sometimes it is good to use earbuds to check your mix. You may be asking yourself, "Why would I use earbuds to check my mix?" Well, good question. The main reason is that your mix will most likely be heard on earbuds by the majority of listeners. Mobile music is the new trend and everyone has earbuds with their phones and MP3 players. So get in the game and make sure you are covering all your bases.
I did just purchase a pair of the Focal Spirit Professional headphones as a personal pair for my own listening enjoyment. I haven't had enough time to evaluate them, but my first impression is that they are on par with the BOSE noise-cancelling headphones. The ear cushions are quite snug and I don't know if I would use them for mixing. When I have more experience with them, I'll post my thoughts.
Producing Music - Where to start
Producing is the construction of music. You have to make choices about the project as a whole and this will include things like EQ, panning, compression, lengths of the delay, when to delay, when to chop up the vocals, when to add guitar solos, how the song begins and ends, and everything else that happens in between. This is not an easy task, but it does have huge rewards that are long-lasting if you do it right.
Producing music is something that takes time to craft and comes with lots of experience. If you're one of the gifted few that can just produce w/o experience, you may still get some insight from this post.
Producing is the construction of music. You have to make choices about the project as a whole and this will include things like EQ, panning, compression, lengths of the delay, when to delay, when to chop up the vocals, when to add guitar solos, how the song begins and ends, and everything else that happens in between. This is not an easy task, but it does have huge rewards that are long-lasting if you do it right.
To achieve this goal, you need to do a bit of homework. Start by listening to some of your favorite music. Pay close attention to all the little details. Take notes on when each instrument comes into the mix and where it is panned in the stereo spectrum. Then pull apart the mix in small bits as you explore every aspect of the sound. A well-produced mix has many layers and when you examine each layer, you will understand how the producer constructed their masterpiece.
To keep you on the right track, start reading some books about producing that have been written by the masters. "Behind the Glass" is a great perspective of what it's like for producers working in the world's biggest studios with some of the most famous musicians. Gain some insight on what will be ahead of you before you cross that bridge.
Once you think that you have a good grasp on how to produce, go and find a small band that is just starting out and see if you can produce them. If you can produce a band that has very little experience in the studio, then you're ready to start your career as a producer. It is no easy task to work with musicians that have never worked with a producer. If you succeed, that is one of the most difficult hurdles to overcome. You've got a lot ahead of you and the rest will fall into place as you move along. You may not succeed right away. In fact, it will take time to get settled into the role. Keep plugging away at the challenges that arise and you will find ways to overcome them.
If you want to start even smaller, just try to produce one song on your own. Do some MIDI composing and get some samples together. See how long it takes for you to come up with the melody and rhythm. This will give yo some insight as to how long it will take when you work with other musicians on their production.

Plugins - An open discussion
There are way too many plugins out there and you may feel confused on which ones to buy and incorporate into your workflow. Here is an open discussion for you to ask questions and get insight for all those plugins. I'll regularly post any new releases or deals that I come across for those plugins that you should consider adding to your system.
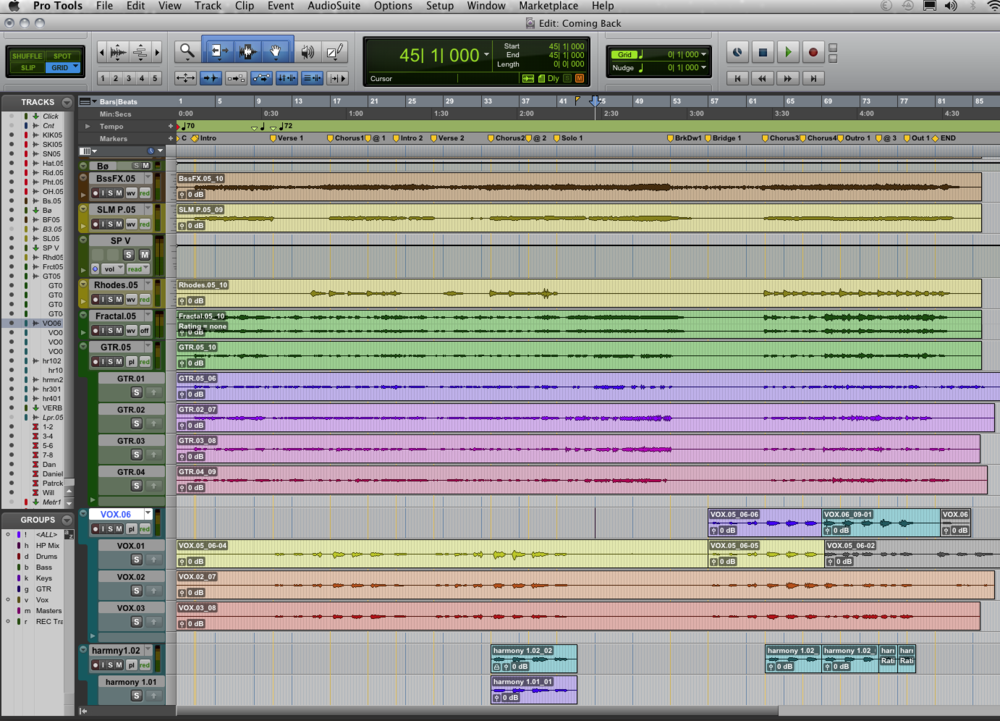
Using Playlists in Pro Tools
Learn more about how to get the perfect take for your vocal recordings using the playlist feature. Get your sessions more organized and utilize your engineering powers to be more efficient in the studio. Click on the post title for the full article.
Playlists feature in Pro Tools
There are times when you need to be a powerful audio engineer and knowing your tools is ever so crucial.
Pro Tools is by far the most powerful DAW on the market. No other DAW is even close to offering the same ability to streamlining a workflow for professional use in the studio. I've tried to use Logic and Studio One, but they just don't offer the speed and professional touch that I need when it comes down to tracking and mixing clients that need to be meticulous with their production.
I've spent years behind the console and doing endless takes on vocal tracks. Now that I've had the experience of working with multiple DAWs, I'd always turn to Pro Tools for the ease and professionalism that is available. It's not even a competition in my opinion. Being able to pull up multiple playlists with ease and then auditioning them with the track is just so convenient in Pro Tools.
Now utilizing the playlist feature is the first step. I've had many sessions come to my studio in the past few months and almost none of them took advantage of the playlist feature. This is just a shame and makes me ever so sad. Punching in is a part of studio life and it is a good way to make sure you get a solid performance out of the musicians. Yet, there is a slim chance you will get an excellent mix out of a session if there is only one vocal performance to mix. The best tactic is to let the vocalist do multiple takes of the track and let them focus on a linear performance. Keeping them in the moment and capturing the emotion of the track is your job. If you are starting and stopping the performance, it will come out disconnected and lack the flow to keep the music moving.
So here is where you start, let the vocalist do an entire take of the song from beginning to end. This can be a scratch track, but orient yourself to the flow and the emotion that the vocalist puts into the track. The most important thing is to just sit back and listen. Don't stop the recording for any reason. Well, unless the vocalist stops singing or asks to stop, but then start them back up again. Once you have this first main track, you can now discuss the road map for how you want to record the rest of the takes. Some vocalist will want to break down the recordings by verse or even by line. I'd suggest that you at least get them to do whole takes of the verses and chorus.
With every pass of the recording, be sure to create a new playlist. You can do this by clicking the drop down menu just to the right of the track name. Choose the "new" option to create a new playlist for recording. There will be a pop up window that asks you to name the track. Just let it auto-name the track and it will add .01 to the end of the track name. This will increase to .02 for the next take and so on. This will be an easy way to keep track of the takes and allow you to streamline your mixing after the recording is finished.
To make sure you have enough material to work with during mixing, I usually suggest at least 3 takes of vocal recordings. However, you can do as many as you feel is necessary or that the vocalist wants to track. Next post we'll get into more of the editing side of the playlist feature.
How to mix reverb on vocals
This is probably the #1 question that I get asked by many of the students. This is one question that has many different answers, but one underlying theme. You have to listen to the music and find the right balance for the reverb within the mix. There are a lot of factors that go into the decision of choosing the texture and depth of the reverb so that it is audible and felt, but not distracting. If the reverb is meant to be huge, use your judgement to make sure the space is the right fit for the mood of the music. Let me go over a few examples of what reverbs should do to add to the mix and not destroy them.
The first thing you need to ask yourself is does the track need reverb. Not all songs need to have reverb! This is something that gets overlooked by amateur engineers and producers. Just because it is there does not mean you need to use it. The simple test, if the mix sounds really good without reverb, then it does not need any reverb.
If you decide that the track could use some texture, depth, width, or space, then try a few different reverbs as a starting point. I usually set up about 4 - 5 different reverbs to give options, but it is not uncommon for me to use a blend of all the different reverbs. Sometimes all you need is one reverb to achieve the sound that is needed for the mix. When one is not enough, then it is time to start experimenting with the audible pleasures of multiple reverbs. Start with two and bring the levels down so the effect of the reverb is not audible. As the mix plays back, slowly bring in the first reverb until it is just barely noticeable. Then bring in the second reverb until they two compliment each other. You may need to adjust the size or predelay to get that silky smooth sound, but make small adjustments as you go along. Just go with your gut and let your ears tell you when the level of reverb is right.
The main thing to keep in mind is that the reverb is not the main focus of the song, so it should be in the background and enhance the song. Keep a modest amount of reverb in your mixes and your songs will start to get more attention. Music is organic and has life of its own. Be sure to let the music breathe and compliment it with the space of your reverbs. When in doubt, less reverb is what will work.
http://shineonstudios.com This video is a follow up video for mixing vocals. Here you'll learn how to add different effects to your vocal tracks to help them blend a little better into the mix. Engineer David Hughes takes a female vocal track and adds a reverb, 2 different delays, and a tube saturation track to blend the vocal a little more into the track.
Building a Home Studio | Part 2
PC or Mac, this is the ultimate question. If you're unsure of which one to get, you can always get a Mac and install parallels to run both platforms. A PC will ultimately be a little more affordable and have multiple options for a decent DAW.
I have personally had both computers and over the years have settled on a Mac. I started with a G4, then moved to a G5, and now I currently use a Mac Pro. If you're going to run a ProTools HD system, you'll need a computer that can handle PCIe cards. You can buy a chassis to house the PCIe cards, but then that is one more cable and device on your desk.
Be sure to get a computer with a fast processor and at least 8 GB of RAM. The i5 & i7 processors are excellent options for audio production. If you're not quite sure what to choose, call a specialist. I work directly with Joseph Secu at Sweetwater.com (800) 222-4700 x1232.
Also be sure to get a good monitor. With all the mainstream TVs having the ability to connect via HDMI or VGA ports you can have a large selection of monitors to choose from. Being able to see what you're working on is very important. You're going to be staring at this computer screen for hours on end, so it would be a good idea to invest in a screen that doesn't strain your eyes.
Tomorrow we'll cover microphones.
Building a home studio | Part 1
Starting a home studio can be confusing at times. There's so much information on the web that you don't know where to start. Here are a few helpful tips on how to get your studio going.
Start with a budget. Stick to the budget. You're not going to build a world-class studio overnight. It takes time to develop a feel for how a studio operates. Buy affordable gear at first to determine if you have the talent and stamina to run a studio. Running a studio is a full-time job and will consume all of your free time. So it's best not to invest all your money into the studio up front.
Get a decent interface. One that has a few mic preamps and some routing options. As you grow, you can upgrade your interface. There are so many options, but you can find used Digidesign 192 HD interfaces on eBay for about $500. Start with one of these if you can afford the system setup. If you're on a tighter budget, I recommend an interface that has been modified by Black Lion Audio. They offer superior A/D conversion and at a price that won't break the bank.
This will be the core of your studio, so spend a little bit of time researching what will work best for you. A good computer is also vital and there are many PC & Mac options. We'll get into that tomorrow.
Internship Dos and Don'ts
I respond to internship requests on a daily basis. Many of the requests are one-sided and offer no benefit to the studio. Here's the deal, an internship is beneficial to both the studio and the intern. If you want to intern at a studio, you have to possess some sort of value to the progress of the studio. The studio is going to give you experience and education so you can be a competent member of the industry. If you have nothing to give back, you'll never get an internship.
Before you go and start pestering studios, you need to do a little prep work. Start with reading a few books on Pro Tools and recording principles. You can read books on many different topics and learn quite a bit about the industry at your own pace. Educating yourself adds so much worth to your assistance in the studio. Once you know the difference between XLR & AES cables, you will move quickly through patching and studio setup.
Buy some gear and do some home recordings. Get a little bit of experience with using a DAW and play around with the settings. If you want to learn Pro Tools, go to www.avid.com and sign up to receive Pro Tools First. It's a free version of Pro Tools that will get you started. Most professional studios use Pro Tools HD, so there will be a slight learning curve, but getting familiar with the fundamentals is important.
Watch a few videos on YouTube and ask some questions in forums. Do not show up to the studio with a bunch of questions. When you're in the studio, just observe! You're there to learn and the engineer is there to work. If clients are on the studio, keep your yapper shut. If someone asks you a question, answer them, but that should be the only time you speak.
If you do have questions during a session, write them down and save them for after the client's session. It all boils down to manners and common courtesy. You need experience and that is what you should absorb. Being in the room while a session is happening is chalk full of experience. Pay attention to how the engineer conducts the session. Keep track of how many takes are recorded and how they're recorded. When the session is over, start to help with the break down. Ask the musicians if they want help loading their gear. Be helpful and it will be rewarded.
Mixing Vocals | Adding Distortion & Lo-Fi
Vocal distortion can be the glue that pulls your vocal tracks together. Just a simple side-chain with the vocals being processed through a distortion plugin or amp head can pull the vocals coward in the mix and at the same time find the right pocket for the vocals in the mix. You may be saying to yourself, "I don't want my vocals all fuzzy and gritty." Not to worry, by side-chaining the effect, you can blend in the dry and wet vocal signals to a level that works best for your mix. The distortion will add just enough color to the vocals so they feel like part of the music and not just ambiguously floating above the music. Slap some EQ on the distortion track to get a brighter or darker tone to your distortion coloring. Just don't go overboard with the vocal effects, unless that is the goal for the track. Happy mixing!
Mixing without plugins
How many of your mixes have plugins strewn across each and every channel? I'm going to guess almost all of them or at least a good portion of them. Are you relying on the plugins to make your recordings sound better? Have you ever tried to mix with just panning and volume adjustments?
Today's modern engineer has become too dependent on digital enhancements of recordings. Things like proper mic placement and quality mic preamps have been replaced with software that constantly needs to be upgraded. Thus, music is loosing the ambiance and mood of the performance that was captured in the studio. Lush layering techniques are being replaced with copy & paste keyboard commands.
I pose this challenge to all engineers that are mixing with a DAW; make a rough mix of your recordings with no plugins just so you can hear the naked truth about your mics, mic placement, and room reflections. Mastering what mic to use and where to place it to capture the best sound will exalt your recordings to unparalleled quality. Musicians will flock to you once you've learned how to capture the purity of sound and translate it in to timeless recordings. If you are using plugins like training wheels on a bike, it's time to grow up and learn how to balance your mixes with knowledge and experience.
Mixing | The Peacock
Every mix has one special element that likes to show off its plume of feathers. I call this element, "The Peacock" of the mix. Sometimes it is the vocals and sometimes it is the guitar. I'm never quite sure until I get in front of the mix. It just takes some time to listen and figure out what needs the most attention; How you should build the mix around the peacock is dictated by the array of colors present in the mix. If you display the peacock properly in the mix, it will draw attention to itself and listeners will be seduced by its beauty. The only thing you need to focus on is making sure the complimenting tracks don't get overlooked and the peacock will do the rest of the work.
Vocal Mixing | Using delay to get wide vocals
Mixing vocals can have its challenges. Do not fret! There are ways to make your vocals big and wide without
laying on huge amounts of compression. Try this technique, add some side-chain delay sends from the main vocal. Add 3 or 4 sends with delays set to different lengths. Slowly bring up the faders on the delay tracks to blend the vocal into the mix. It's also a good idea to have different eq curves on each of the delay tracks. Play with filters to get the right tone for your mix.

Black Lion Audio Signature 002 Mod

There are certain things that contribute to a great recording. The first is the interface that you're using. You can go and spend some $$$ on a HD converter and get great results. However, there is an alternative for great sound at a more affordable price. Black Lion Audio (www.blacklionaudio.com) is a company based in Chicago and they have some modifications that rival some of the big expensive converters. For under $2,000 you can get the BLA Signature Mod on your 002 or 003 rack. We currently have one that is used as our mobile rig and it holds up quite well. Many of the live recording that Shine On has been hired to record have been tracked with our modified 002r.
The Signature Mod will improve your converters, clock, and mic pres. These are huge improvements over the Digidesign stock interface. They also beef up the headphone amp to provide a more accurate monitoring option. The A/B recordings we did with the interface are jaw-dropping. There really is no comparison between the recordings. The mod improved the attack of transients and the depth of the EQ range. Drums have more punch, guitars roar and scream with more intensity, bass is bigger and richer in the low end, and vocals just rip through the mix to sit right in the pocket. These improvements are well worth the investment. You'll save time in the studio and your mixes will have a brilliance that just cannot be matched at this price point. If you'd like to get more info or experience with the interface, sign up for one of our Pro Tools lessons and an engineer will show you the ins and outs of this impressive upgrade to your studio.
How to start a recording studio | part 1
You've decided to start a recording studio. Now comes the planning for how to build your studio from the ground up. There are so many options, so let me help you consider a few that are crucial to the success of your new studio. I've been in the business for over 20 years now and I've seen what works and how well everything works. There are many different types of audio production studios, but for this segment, I'm going to focus on the beginner's project studio. Though you may have already started to build your studio, I'll be offering advice on things to consider for the success of all levels of studio production.
Before you spend too much time planning or spend any money on gear, take time to hash out your budget. You'll need to make some tough decisions about what is necessary now and what can be purchased down the road as the studio grows. Start a spreadsheet of your available finances and keep track of what you're spending. The last thing you want to do is buy a bunch of gear and then not have the funds to connect the pieces. There are things that many new studio engineers overlook and this is one main reason I'm writing this article.
First, you have to decide if you're going to be a PC or a MAC based computer system. You could get a new MAC and load Windows with the Parallels program. That's all up to you. There are advantages to both OS systems, so this decision has to fit with your configuration and your budget. PC systems are typically more affordable, but do carry the risk of more frequent crashing and data loss. MAC systems are more expensive and not as flexible as a PC based system. I'm not going to get too in-depth here, but if you'd like to post a comment, I'll do my best to respond.
For now, we'll assume that you've made your computer decision and you're ready to move on to the core of your system, the DAW. The DAW ( Digital Audio Workstation) is the heart of all digital recording studios. This is the interface that will provide recording and mixing capabilities for your studio. Most DAWs come with a hardware interface which does the A/D & D/A conversion for your audio. This is by far one of the most important choices to make when building your studio. The quality of audio conversion will ultimately impact the detail of the audio that comes out of your studio. The higher quality converters will give you a more accurate monitoring sound and yield a more dynamic range to your mixes. The beauty of most DAWs today, they will work with almost any interface you choose. This makes the options more bountiful and presents the opportunity for 3rd party companies to get into the market. Ultimately, this allows engineers the ability to mix and match software and hardware to customize a studio setup that is just right for their needs. Customize is such a great word and it is such a liberating concept!
I've personally worked with many different DAWs in my career and they all do a fine job of recording and mixing. There are some that only work on PC and some that only work on MAC, but most are cross-platform, so do pay attention to what is compatible with your system. The most widely used DAW is AVID's Pro Tools. Virtually every professional studio I've been in over the years is running Pro Tools as their primary DAW. It's not cheap software, but it is very user friendly with a mild learning curve. There are tons of books and videos out there to get you started working in Pro Tools and I'd recommend this as your primary DAW. The new line of AVID HD I/O interfaces have excellent converters and the audio quality is pristine. However, Pro Tools HD systems are not cheap. The entry level system is the Omni HD + Pro Tools HD Native and that starts at $4,999.00. Now there are some upgrade options, but just to get into Pro Tools HD, you may be spending a big chunk of your budget. If you can afford a quality interface, it will pay dividends down the road. Just be sure you are buying fear that you can grow into and not grow out of quickly. One pit fall I regularly encounter is folks who buy bargain gear with the intention of selling it when they need to upgrade. My warning is that you may not be able to sell the gear for a decent price, so don't rely on this strategy to recoup your capital funds.
Hope this was some useful insight for you to consider. Keep in mind there are many options out there and I highly recommend that you at least consider multiple DAWs and Hardware interfaces before you commit to purchasing. You should also look into financing your purchases and Sweetwater (.com) has some nice 0% interest for 24 months financing options. If you want to talk with my sales engineer, Joseph Secu x1232, he'll give you some good advice on what would work best for your setup. He's helped many of my clients purchase the right gear for their home studios and he's been helping me for over 14 years. I only have great things to say about Sweetwater and Mr. Secu.
Please leave any comments and I'll respond as soon as possible. Thanks for reading part 1 of this blog article. The next section I'll be discussing vocal microphones and preamps.
Trade Gear for Studio Time | Get More From Your Gear
Trade your musical equipment and instruments for studio time. Great way to unload the gear that you don't use or don't need any longer and get some quality studio time to work on your next recording or mixing project. You can also trade gear for Pro Tools lessons. Click the post title for more details.
You have gear just collecting dust and that's not the plan you had in mind when you bought it. You don't want to sell it on eBay cause you won't be able to get hardly anything for it. Now you're stuck with gear that is just taking up space.
Here's a solution that will benefit you and also help Shine On Studio & the studio's students that are trying to make the start in the music industry. I'm always looking to try new gear and add gear to the studio. Options for gear allows musicians to get the sound that's in their heads. Plus, studio interns donate lots of time to helping with sessions and doing work in the off hours. This will be a great way for me to repay them for all their hard work.
Contact the studio for further details.
Behind the Scenes | Recording Engineer Clean Up Work
The recording engineer's work is not done after the session is over. The engineer must spend time working on the audio files to clean up unwanted noise in the files and make sure that fades are properly applied to smooth transitions. Back up copies need to be made and even though the engineer doesn't sit there and watch the computer transfer files, the engineer has to wait and check after the transfer is done to make sure that all the files transferred properly.
I'm usually in the studio hours before a session to check on timing issues and pitch correction. Returning to a session after taking some time off allows me to hear the tracks again with fresh ears. This way I'm more likely to catch little mistakes and focus on the recording's blemishes. This also gives me time to focus on ways to approach and produce the recording. I usually take this time to make notes for mixing the tracks. This way I am prepared for mixing as soon as the client arrives at the studio. If any re-tracking is required, will usually start there and then proceed to mixing. It's the little things like this prep work that keep my clients happy and keep them coming back to record more at Shine On Studio.